First steps
My journey began when I was searching for a way to produce some lined paper, with a very particular layout, that my girlfriend could use to practice her calligraphy skills. Initially, I investigated some graphical applications with the usual point-and-click interfaces such as GIMP, Scribus and Inkscape. As excellent as all these applications are I found it was tedious using them to create a precise, repetitive layout that was likely to need refining many times. A typical problem is: realising that you made a mistake when drawing line 1 when you are already on line 44 and all previous lines now need to be shifted.
|
|
|
|---|---|---|
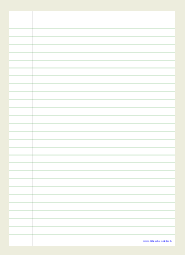
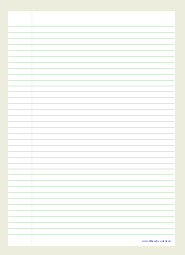
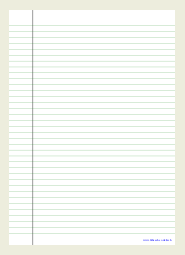
Click on the links above to view PDF samples (opens in new window) or right-click to save/download. | ||
As an alternative method I thought that it would be easier to create a layout programmatically. My first thought turned to using raw Postscript which isn't as bad as it sounds. I found an excellent tutorial on Postscript by Eric Weeks and in a very short space of time I was managing to produce some excellent layouts.
Graphics Language Editor
Right at the beginning of Eric's tutorial he mentioned another programming language, GLE, which, as the name suggests, is focused on producing beautiful graphics. I soon realised that GLE could produce my desired output faster than typing the much more verbose Postscript. GLE is probably more often used for producing complex scientific graphics to a quality suitable for publishing in typeset documents. However, it was suitable for my trivial use too.
Tools needed
GLE is available for *nix platforms in source code, binary formats and is included in many of the GNU/Linux distributions (in my case Debian Wheezy/testing). GLE is also available as binary installers for the Apple and Microsoft platforms. You will also need a text editor, I used (G)Vim which has a syntax plugin for GLE, and a viewer for Postscript and/or PDF, I used GV and Xpdf.
In Debian installation is as simple as:
aptitude install gle-graphics
This installed version 4.2.4c-2 of GLE (at the time of writing).
Getting started
A GLE program is a script which outputs Postscript, which optionally can be converted to other formats, to be printed on its own or included into other documents. We start this simple program by setting the page size.
size 21.0 29.7   ! size of drawing area is A4 portrait in cm
set color gray   ! set colour to grey until further notice
In the code section above we have set the document size to A4 by specifying the size in centimetres. Width first then height, so, in this case the document will be in portrait orientation. Note that "!" is used to denote the start of a comment which can be preceded on the same line as some code. The second line sets the colour to be used for all drawing (or text) until the colour is re-set.
amove 3 0   ! move to position 3,0 (x,y) in cm
set lwidth 0.1   ! line width to 0.1 cm
rline 0 29.7   ! draw a line 0x and 29.7y relative to current position
Next, we move into position for the start point of our first line. The bottom left corner of our page is 0,0 (x,y) and as our first line will be the left margin we will move 3cm along the x-axis and remain at 0 on the y axis. We now set the line width to be a tenth of 1 centimetre and finally draw the line by using the command "rline". rline is short for relative line and draws a line from the 0x and 29.7y relative to the current position.
set color green
set lwidth 0.02
amove 0 27.5                              ! repeat these two commands
rline 21 0                                ! until you reach page bottom

amove 0 26.5
rline 21 0
Our sample page has just one vertical line (the left margin) and the rest are horizontal lines. It is convenient now to change the settings for our horizontal lines, so program lines 7 & 8 change the colour and the line width. Line 10 changes our position to the absolute position 0,27.5 and line 11 draws our first horizontal line. We repeat these commands for the next horizontal line but decrease the value for the y-axis by 1cm. Those two commands have to be repeated until we have a page full of horizontal lines. Note, that 27.5y is near the top of the page and we are slowly moving towards the bottom.
For this simple example we have just repeated the "amove" command and decreased the value of y by 1cm each time to create our full page of horizontal lines. There is a faster, and more flexible way to achieve the same thing using a conditional loop. Conditional loops and many other techniques are comprehensively described in the GLE user manual.
We will finish our example by printing some text at the bottom of the page.
set color blue   ! set color to blue
set just right   ! set text justification to the right
amove 20.5 0.5   ! right side of text at this position
text fitheach.co.uk/life/tag/tech/        ! this is our text
Firstly, we set the colour, then on line 124 we set the text justification to the right side of the A4 page. We now move to our new position and the end of our text will be positioned at 20.5, 0.5. Finally, we use the command "text" to print.
All we need to do now is save our little GLE program and compile our output. GLE, as tested, supports EPS, PS, PDF, JPEG, and PNG. For my purposes I used PDF which is readable on many platforms and uses a defined page size. To compile the GLE file into an output file use a command like this (on *nix type systems):
gle -noctrl-d -device pdf -output lined-a4-075-light.pdf lined-a4-075-light.gle
GLE will create an EPS file which, in turn, will be converted to PDF. The PDF can then be printed or sent to other users. If you have a printer that is capable of edge-to-edge printing the lines will go right to the edge otherwise there will be a small margin around the page.
An explanation of the "-noctrl-d" argument can be found on this page.
By clicking on the PDF thumbnails, above, you can view/download PDF versions of lined paper with: lines with 1cm gap, lines with 0.75cm gap and lines with 0.75 gap and a heavy left margin.
GLE can be used to produce some very sophisticated graphics but is also straightforward enough to be used for something simple. Creating something graphical without using a mouse is also liberating.